Let’s resolve your orange blinking light

You’re in the right place! Use our helper tool to get you pumping again (including submitting a replacement request if needed).

UPDATE YOUR PUMPS! A pump update can resolve an orange blinking light. Make sure you have updated to the latest Willow™ app version to access new pump updates.

WE’LL TAKE YOU THROUGH THE FOLLOWING TROUBLESHOOTING STEPS:

  1. Check for common issues
  2. Check for damage
  3. Reset pump
  4. Check assembly

Don’t have time right now?

WHAT’S THE ISSUE?

Orange Blinking Light

When you see an orange blinking light on your pump, notice a corresponding alert on your Willow App.

Which alert is showing in your Willow App?

Open and Close Pump

Flush through Container Valve or Attach Bag

I’m not sure or both

1

WHAT’S THE ISSUE?

“Flush Through Container Valve or Attach Bag” Alert

Common cause:

Damaged milk bag or milk bag misassembly. Inspect milk bag edges and valve for damage. Replace if necessary. Watch the video or follow the troubleshooting steps below.

gif01
1

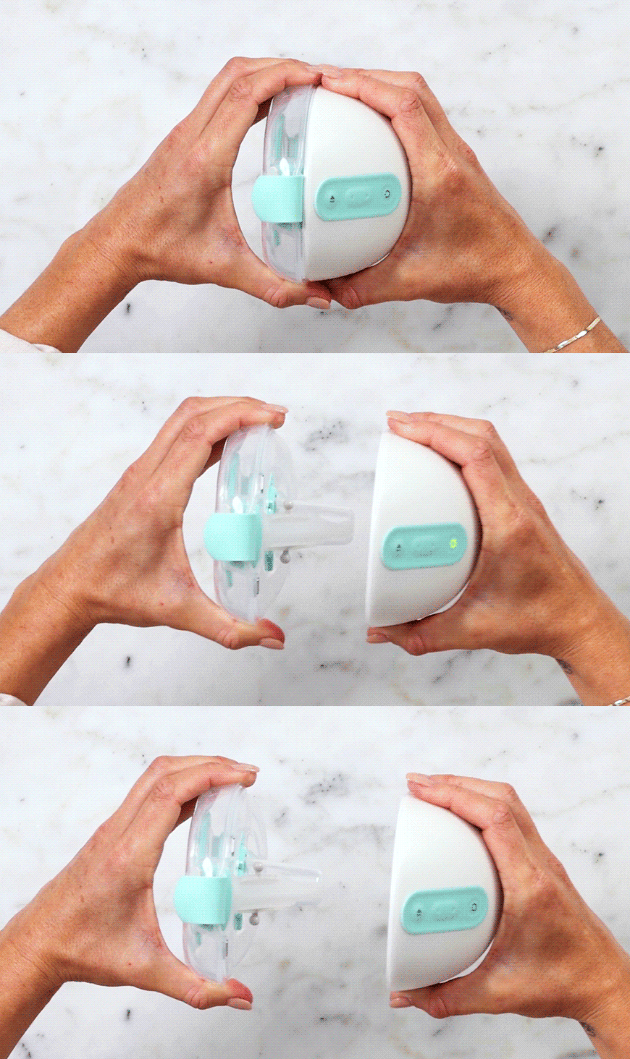
Separate pump from flange.

gif02

2

Check that flextube™ is pressed all the way onto flange spout. Open flange door. Check that blue/green end is firmly pressed into slots. Listen for a ‘click!’

gif03

3

Check that milk bag’s valve is pressed firmly against flextube™. Close flange door. Make sure milk bag is tucked behind, but not touching, flextube™ grips.

gif04

4

Reassemble pump, then try aligning again.

gif05

5

Press play. Wait for pump to begin stimulation. Secure your bra.

Common causes:

Residue in valve or tucked valve. Watch the video or follow the troubleshooting steps below.

step-01

1

Separate pump from milk container. Detach flextube™, unlock and push insert out to detach, and open cap.

step-02

2

Check for tucked valve. Untuck gently with toothpick.

step-4

3

Check valve for milk or soap residue.

step-04

4

Rinse with warm water for 30 seconds. For stubborn residue, gently use a cleaning brush or try deep cleaning.

step-05

5

Reassemble pump, then try aligning again.

step-06

6

Hold pump just firmly enough to breast to create a seal. Press play. Wait for pump to begin stimulation. Secure your bra.

Has this resolved the issue?
1

WHAT’S THE ISSUE?

Orange Blinking Light

Common cause:

Damaged milk bag, milk bag misassembly, or flextube™ grips not securely in pump sockets. Inspect milk bag edges and valve for damage. Replace if necessary. Watch the video or follow the troubleshooting steps below.

step-01

1

Separate pump from flange.

step-02

2

Check that flextube™ is pressed all the way onto flange spout. Open flange door. Check that blue/green end is firmly pressed into slots. Listen for a ‘click!’

step-03

3

Check that milk bag’s valve is pressed firmly against flextube™. Close flange door.

step-04

4

Tuck milk bag behind flextube™ grips, avoiding magnets.

step-05

5

Close pump straight on, letting magnets do the work. Ensure flextube™ grips go into pump sockets.

step-06

6

Try aligning with assembled pump.

step-07

7

Press play. Wait for pump to begin stimulation. Secure your bra.

Common causes:

Residue in valve, tucked valve, or flextube™ grips (gray balls) are not securely in pump sockets. Watch the video or follow the troubleshooting steps below.

step-01

1

Separate pump from milk container. Detach flextube™, unlock and push insert out to detach, and open cap.

step-02

2

Check for tucked valve. Untuck gently with toothpick.

step-03

3

Check valve for milk or soap residue.

step-04

4

Rinse with warm water for 30 seconds. For stubborn residue, gently use a cleaning brush or try deep cleaning.

step-05

5

Close pump straight on, letting magnets do the work. Ensure flextube™ grips go into pump sockets.

step-06

6

Try aligning with assembled pump.

step-07

7

Hold pump just firmly enough to breast to create a seal. Press play. Wait for pump to begin stimulation. Secure your bra.

Has this resolved the issue?
1

WHAT’S THE ISSUE?

“Open & Close Pump” Alert

Common cause:

Flextube™ grips (gray balls) are not securely in pump sockets. Watch the video or follow the troubleshooting steps below.

1

Separate pump from flange.

step-02

2

Locate flextube™ grips. Make sure milk bag is tucked behind, but not touching, flextube™ grips.

step-03

3

Close pump straight on, letting magnets do the work. Ensure flextube™ grips go into pump sockets.

step-04

4

Try aligning with assembled pump.

step-05

5

Press play. Wait for pump to begin stimulation. Secure your bra.

Common cause:

Flextube™ grips (gray balls) are not securely in pump sockets. Watch the video or follow the troubleshooting steps below.

step-01

1

Separate pump from container.

step-02

2

Close pump straight on, letting magnets do the work. Ensure flextube™ grips go into pump sockets.

step-03

3

Try aligning with assembled pump.

step-04

4

Hold pump just firmly enough to breast to create a seal. Press play. Wait for pump to begin stimulation. Secure your bra.

Has this resolved the issue?
2
You Got This!

TRY THIS

Check for Damage

Common cause:

Wear and tear. Replace parts every 90 days or sooner if wear and tear is visible. Watch the video or follow the troubleshooting steps below.

Disassemble pump and parts.

step-01

flextube™

Bend the flextube™ to check for tears or holes.

step-02

milk container

Check milk container for cracks or defects. Check that the dial is working properly. Check for 4 magnets.

step-03

flange

Check flange for damage or defects. Check for 4 magnets.

step-04

milk bag

Check milk bag for tears or holes.

Did you find damage?
3
ALMOST DONE!

TRY THIS

Reset Your Pump

Common cause:

Pump requires restart. Watch the video or follow the troubleshooting steps below.

step-01

1

Separate the pump from flange or container.

step-02

2

Locate restart hole next to power port. Gently insert blunt end of a paper clip or earring back into hole.

damage_step-03

3

Pull the paper clip or earring out. Wait a few seconds for the buzzing reboot noise, which lasts 2-3 seconds.

Move on to assembly.
4
LAST STEP!

TRY THIS

Check Your Assembly

Common cause:

Misassembly of pump parts. Watch the video or follow the troubleshooting steps below.

step-01

1

Press the flextube™ all the way onto flange spout. Firmly press blue/green end into the slots. Listen for a ‘click.’

step-02

2

Crinkle bag by rubbing between fingers and thumbs. Press valve firmly against flextube™. Close flange door.

step-03

3

Tuck milk bag behind flextube™ grips, avoiding magnets.

step-04

4

Close pump straight on, letting magnets do the work. Ensure flextube™ grips go into pump sockets.

step-05

5

Try aligning with assembled pump.

step-06

6

Press play. Wait for pump to begin stimulation. Secure your bra.

Common cause:

Misassembly of pump parts. Watch the video or follow the troubleshooting steps below.

step-01

1

Press flextube™ all the way onto insert tunnel spout.

step-02

2

Press blue/green end of flextube™ straight on and firmly against cap.

step-03

3

Set the dial to #1. Close the cap.

step-04

4

Close pump straight on, letting magnets do the work. Ensure flextube™ grips go into pump sockets.

step-05

5

Try aligning with assembled pump.

step-06

6

Hold pump just firmly enough to breast to create a seal. Press play. Wait for pump to begin stimulation. Secure your bra.

Has this resolved the issue?

Request or Purchase Replacement

REQUEST REPLACEMENT

Sorry there is an issue with your pump parts. Warranty on flanges, flextubes™, containers and inserts lasts 90 days from purchase. For issues with the pump parts during the warranty period or help with your issue, contact Willow Care.

PURCHASE REPLACEMENT

If you have been using your pump parts for more than 90 days, shop for new pump parts.

flanges

milk containers

flextubes™

container inserts

Contact Willow Care

Contact Willow Care

Short on time?

We’ve designed the helper tool to provide you with the steps most likely to resolve your issue first. Prefer to complete the steps later? Enter your email address in the box, and we’ll send you the link to the helper tool.

Your email address will not be used for any other purposes.