A Complete Guide to Using Your Willow 3.0 Pump

Declare yourself free with Willow.

Hey, mama! Whether you’re Willow-curious or have just received the life-changing wearable Willow, here’s a quick guide to everything you need to know. From how to assemble, clean and connect your super smart pump, we’ve made it as easy as possible for you. Why? Because you already have a lot on your plate.

Keep reading to discover more about how to use the Willow Pump.

What Comes With Your Willow Pump?

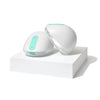
  • Two (2) Willow Pumps: You get two Willow Pumps, one for each breast, so you can pump both simultaneously. Not only does this save you time, but it may increase your milk output.

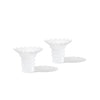
  • Two (2) 24mm: You can choose to purchase a 24mm or 27mm pump kit depending on your nipple size. 21mm flanges are available for purchase and our new sizing inserts make it possible to pump with Willow if you measure smaller.

  • Two (2) Flextubes™: The Flextube™ pulls milk out of the breast using continuous suction. It's what makes Willow totally spill-proof.

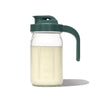
  • 24 4 oz. milk bags: Our spill-proof milk bags are disposable and self-sealing. All you have to do is remove the bag after your session and place it in your refrigerator or freezer.

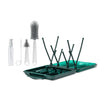
  • Two (2) cleaning brushes: Willow is super easy to clean. Use the two cleaning brushes to clean the Flextube™, milk container and flange for each pump. All parts and accessories are also dishwasher-safe.

  • Charger: Willow is rechargeable, making it easy to transport wherever you go. A fully charged battery will last five pumping sessions!

Willow 360™ Wearable Breast Pump

Willow 360™ Wearable Breast Pump

Willow 360 is designed with a zero-gravity latch to give you 360° of leak-proof mobility. It's the hands-free breast pump that changed the game.

Ready to Get Started? Here’s How to Assemble Your Willow Pump

Assembling your Willow is simple and fast. But before you dive in, check out this quick video tutorial (and while you’re watching, charge your Willow so it’s ready to go!)


How to Wake Up Willow

  1. Plug your charger into an outlet and then into the pump.

  2. Wait until the pump lights up.

  3. Unplug the charger from your pump.

With Willow wide awake, it’s time for assembly. Before doing so, be sure to examine your pump for any damage, cracks, chips or wear. Then, follow these steps:

  1. Connect the Flextube™ to the flange. Push the Flextube™ tip all the way down onto the flange spout. Then, slide the Flextube™ collar into the top of the flange. You should hear a click.

  2. Attach the milk bag. Slide the flange door by pushing the blue thumb pad in and sliding up. Then, pull the door open. Drape your milk bag over the flange and make sure the writing “THIS SIDE UP” is facing away from the flange. Firmly press your milk bag valve onto the Flextube™ collar.

  3. Close the flange door. Press the center of your milk bag into the deepest part of the flange and tuck the edges under the tabs.

  4. Connect flange to the pump: Align the bottom tab into the slot on your Willow. Snap the two parts together, starting at the bottom and closing at the top. Now, you’re ready to go!

How to Connect to the Willow App

The new Generation 3 Willow app allows you to track your milk output, customize your settings and more. To connect, simply download the Willow app and go through the Quick Start Guide. The app will connect your pumps as you journey through.

Download Willow for iOS

Download Willow for Android

How to Find the Right Flange Size For You

Before you even think about going on your pumping journey with Willow Pump, it’s important to find the right flange size for you. Did you know? Willow offers six different flange sizes including 21mm, 24mm and 27 mm.

Need a quick way to check if your flange size is correct? Follow this easy-to-use checklist.

  • Do your nipples move freely? Your nipple should move freely in and out of the tunnel without redness or pain. Otherwise, your flange could be too small.

  • Be careful of how much of your areola pulls into the tunnel. Do you notice that a bit of your areola is pulling into the tunnel with each cycle? If there is no areola movement, your flange might be too small. If there is too much movement, it might be too big.

  • How does it feel? This might be the most important thing! Make sure you’re not feeling any discomfort or pain. If you are, you probably have the wrong flange size and need to adjust.

  • The warning signs. If you are experiencing low milk expression, plugged ducts, redness, swelling or nipple pain, these are all signs that you might have the incorrect flange fit. Head to our flange sizing tool so you can find the right size for you.

The Perfect Fit Bundle

The Perfect Fit Bundle

Need extra sizing support? Get a set of four inserts (they help create a more snug flange fit), access to a Sizing Specialist for 1:1 guidance, and more.

How Long Do You Pump With the Willow Pump?

The perfect alignment means that your nipple is centered in the flange tunnel without touching the sides of the flange and you experience NO pain or discomfort—ever.


It takes practice to establish the right alignment, especially as you get started with Willow, so be patient while you’re getting the hang of it.

To get started start, follow these steps:

  1. Determine the direction of your nipples: Look in the mirror. Nipples can point forward, upward, downward or to the side. Determining the direction of yours can help you understand how to align your flange.

  2. Practice: Grab your Willow flange, support your breast and move forward. Bring the flange to your breast in the same direction as your nipple. If your nipple is in the center of the flange, you’re good to go!

How to Choose the Right Bra to Wear With Willow

Willow Daily Pumping Bra

Willow Daily Pumping Bra

You’ll never want to take off the aptly-named Daily Pumping Bra. Custom-made for Willow by The Dairy Fairy, it’s comfy, supportive, and no-fuss—what every breast pump bra should be.

Picking the right bra matters! The perfect bra will keep Willow secure during your pumping session. This ensures you take full advantage of Willow’s spill-proof design and provides extra comfort for you.


How to Establish a Good Seal and Latch

A good seal and latch are essential for a complete pumping session. To ensure you obtain a good seal, follow these steps:

  1. Press your pump against your breast while initiating latch: As the pump establishes suction, press the pump firmly against your breast. This should take under a minute to complete. If it’s been more than five minutes, try again.

  2. Lean back in Stimulation until you reach Expression: If you hear short, quick sounds, you’ve reached Stimulation mode. Lean back like you’re sitting in a chair to maintain the seal. Once you reach Expression (slow and quiet sounds), you’re free to move around as you please.

If you feel Willow shifting, you may need to adjust the straps of your bra for a tighter fit.


What is Flip to Finish and How To Get it Right!

Our Flip to Finish technique ensures every drop of milk goes into your bag or container after each pumping session. Flip to Finish prevents the loss of milk ounces that may remain in the flange or Flextube™. This process captures the remaining milk and transfers it to your milk bag or container.

When you’re ready to end your pumping session, you’ll need to make sure your pump is paused, which means the white LED should be solid or pulsing. Then, you’re ready to finish your session.


How to Use Willow Pump Milk Containers

The Willow Pump is designed to allow you to pump directly into spill-proof storage bags or milk containers. These containers are dishwasher safe, reusable, and created for ease of transfer from container to bottle.

These containers can be inserted straight into your Willow Pump, and will collect and store milk during each pumping session. Containers hold up to 4 ounces of liquid per session, and there are no pesky cords or attachments necessary!

How to Clean Your Willow Pump

You’ll need to clean the flanges, Flextubes™ and milk containers (if applicable) after every use. You can place these items in the dishwasher (top rack only) for a quick clean. Or, you can also clean them by hand:

  1. Separate the parts: Separate the flange from the pump and the FlexTube™ from the flange. Also, separate the milk container from the pump.

  2. Rinse and soak: Rinse both the Flextube™ and the flange with water and soak them in mild dishwashing soap for 5 minutes (minimum). You’ll also want to rinse your milk container for 60 seconds and then soak it too in your soapy water.

  3. Wash and brush: Wash and brush the pieces using the brushes included in your Willow kit for 60 seconds. You can clean the spout as well as the top opening of your Flextube™ with the brush.


    User-added image
  4. Rinse and air dry: Rinse all of your parts thoroughly and then place on a paper towel to air dry. If you see residual milk, repeat the cleaning process.

Important: Never wash the pump part of your Willow. If you need to, wipe down the front of the pump gently with a damp cloth.


Dapple® Baby Pump Cleaning Kit

Dapple® Baby Pump Cleaning Kit

This bundled trio of Dapple Baby products is designed for cleaning your Willow 3.0 and Willow Go pumps, both on-the-go and at home. Dapple Baby products are specifically formulated to remove breast milk residue.

Parts Replacement

To ensure your Willow Pump continues to operate as intended, it’s important to replace your parts when they show visible wear. We recommend replacing the flanges and FlexTubes™ every 3 months.

Important: Do not reuse your milk bags. These are single-use-only bags that will not seal again.

Have Questions, Mama? We’re Here to Help! Have more questions about how to use your Willow Pump? We’re here to support you. For additional answers, help.onewillow.com or reach out to our team of moms.

The content provided here is for informational purposes only and is not intended to replace the advice of medical professionals. It should not be used to diagnose or treat medical conditions or problems. Please contact your healthcare provider with questions or concerns.
Which pump is right for you?

Which pump is right for you?

Which pump is right for you?

Which pump is right for you?

Which pump is right for you?

Popular Topics